DON'T PANIC IF YOU HAVEN'T COME TO GRIPS WITH THE REVIT ROTATE COMMAND.
This neat little trick really helped me come to terms with the Revit Rotate Command.

Firstly, select the object you want to rotate. In this case I have used a line purely for demonstration purposes, as well as maintaining anonymity.
You will now be able to select the 'rotate' command.
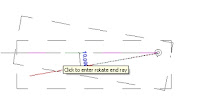
Revit will (by default) try and find the center of the object and place the rotation symbol there.
"Left Click" , select & drag the rotation symbol right off the page. Drop it in the 'Project Browser'
You should be able to zoom in & out and pan around your project view. If not repeat the first step.
After Zooming around drag the rotation symbol back onto your screen and let go, once you have found the desired position on the object you wish to rotate.
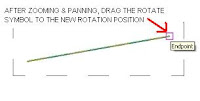
Rotate away at the new position you have chosen.
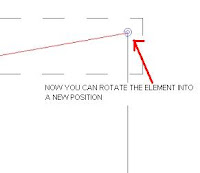
This trick stems from being able to drag the rotate symbol freely onto different places in you project. It just so happens that mistakenly I dragged it to the project browser on day.
Though this may seem perfectly logical to some, or you have seen it before. For others this is a great new trick....It is to you whom I say: enjoy this neat trick, I am sure it will come in handy one day.
For the ones that have seen this before, or were totally bored reading this tip.....
blah blah blah blah blah blah blah blah blah blah blah blah blah blah blah blah blah blah blah
REVIT: ROTATE REALM REALLY RESOLVED RADICALLY
Wednesday, January 3, 2007
Sunday, December 3, 2006
Import PCP files from Revit to ACAD
Revit has a fantastic custom plot style table, where if you have a regular client or consultant who works in a Cad type environment, you could export to their specific line weight styles. However when exporting to dwg type files, you will notice that you have a pcp file attached. If this is a "one off" client /consultant, you could send them this pcp file, so they could set up a ctb file from your pcp file.
- Step one
Go to your print set up, select the plot style table options bar.
Select “new”.
- Select the option “use pcp or pc2 file”
- Step 2
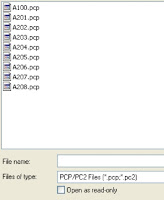
Select the corresponding file.
- Step 3
Go to your plot style table editor just to double
check that the colors correspond with your Revit file.
Now you could even choose to send the consultant/client the ctb file, depending on the mood you are in.
Tuesday, November 28, 2006
sKETCH rEVIT tRUSSES as rAILINGS
This is quite a fast way (while still in sketch phase of a project) to create the impression of trusses, specifically for elevation type views.Create a new baluster family as a solid extrusion at the desired angle. (I generally create these specific to a project, roof pitch etc, so no fancy parameters here.) Load this into your project, edit and create a new railing.I generally exclude centre, start and end baluster 'trusses' and just use a standard fill with set centres.The nice thing about this, is that you can draw a few lines and represent the "trusses".
New Additions to Revit
CONTACT ME
So this is me, I have been using Revit for a while now and feel that it is time to contribute back to the Revit Community by sharing things that I find useful, which may be of use to others.
I will hopefully be updating this blog as often as possible
If you want to comment or contact me:
revitanonymeATgmailDOTcom
I will hopefully be updating this blog as often as possible
If you want to comment or contact me:
revitanonymeATgmailDOTcom
Subscribe to:
Posts (Atom)